Hardware used:
Processor: AMD FX 4100 (3.6 GHz) 4 core, 12MB CacheMother board : M5A88-M, Bios Ver 0801
RAM: 8GB
HDD: 1TB.
OS: Windows server 2008-R2, with SP1.

1. Change Name of computer to SERVER and Disable the firewall.
My Computer-->Properties-->Advanced system settings-->computer name-->change.
I have used a name 'SERVER'. and I have set the IP of the physical machine as 192.168.10.20
2. Add role Hyper-v in Physical machine
'ServerManager' and add role, Select 'Hyper-v' and press 'Install'

After successful installation expand the roles in Server management, now we have to create a new Virtual Machine.
3 Hold on..... before that we have to create one virtual network in Hyper-v as bellow

I named it as VM Network, and choose the 'Private Virtual Machine Network'
4. Now we can go for Virtual machine creation


5. For setting up AlwaysOn, we need minimum 3 VM, out of which one should be Active Directory. First I am creating the VM for AD and so I am using the VM name as AD. Using this wizard we can keep the Virtual machine file in any location of the Physical machine. I am using a location in my E: drive.

6. I have allocated 1 GB of RAM to my first VM. You can allocate it as per the availability.

7. Select Private network, which we created. This is our Domain network.

8. Choose the virtual hard disk

9. Now we have to say about the Operating system on this VM. I am using same OS as my physical machine which is Windows Server 2008. Here I have used the 'Install an operating system from a boot CD' and then press the finish button

10. One VM will be created and we can try to start the Virtual machine which named as 'AD'
Expand the Roles and then under Hyper-v-manager you can see your machines name and in the Middle you can see the VM. Right Click and 'Start'.
Oops !! I got an error as ' The virtual machine could not be started because the hypervisor is not running' , which seemed as little complex. This is related to AMD processor and in this version of Hyper-v it is not handled. But we have a workaround to resolve this, and we have to disable one feature .
In command prompt we have to use a command as below
bcdedit /set xsavedisable 1
After this the physical machine has to restart. And now we can see the VM is running.
Once you connect to that VM, you can install OS from DVD drive. On first login Administrator password has to set. Then connect to AD as administrator, using Hyper-v manager, and Disable Firewall, and set the computer name as 'AD' and set the 'VM Network' IP as '192.1.1.1'.
You can copy the Virtual hard disk and create Node1 and Node2.
So now we have 3 VM with the below details
1. AD (ip 192.1.1.1)
2. Node1 (ip 192.1.1.2)
3. Node2 (ip 192.1.1.3).

11. Now we have to Setup Active Directory in the first virtual machine -AD.
Go to 'server manager' and add the feature .Net Framework 3.5

Finally I got the below screen

12. After that add the Role 'Active Directory domain services'

Finally I got a screen like this (below)

So installation is over.
13 Now we have to configure the Domain Controller for that we have use a command.
Start-->Run-->type 'dcpromox.exe', then you can see a screen like this, which is doing its checking

We can go to the next screen, press next
Now we have to create a new domain,


It
started its verification

Select
Forest Functional Level as Windows Server 2008


Now we need to restart the virtual machine AD

14. Now we have to work with two of the Node virtual machines. We have to add those machines to the domain.For that we have to add a role "DNS Server". But if we want to add 'DNS Server' role, ".Net framework 3.5" should be installed.
So now we are going to add the .Net framework 3.5
15. Set IP as 192.1.1.2 and computer name as Node1
After that you need to restart the machine
15. Add Feature .Net Framework 3.5 in Node1 virtual machine.
Follow the same step as 11, in Node1 virtual machine
16. Add role DNS Server in Node1
Server Manager --> AddRole-->DSN Server
17. Log-in in AD and create a domain user,
Administrative Tools -->Active directory
users and computers -->Users

18.I have created a domain user 'manupradeep\manu' . After creation of this user you need to add this user in Administrator.
For that click 'Administrator' group in the same window, then add the users.
19 You can disable the firewall in all the VM as this is a demonstration. In actual case we have to create rules in Firewall for Inbound and outbound connection.
Now you have to make sure you are able to ping to each machine. If you are not able to ping them, something wrong in the setup and then you will not be able to setup your domain network
20. Now we have to add Node1 virtual machine to domain the created domain. In my case domain is Manupradeep.com
For that connect to Node1, using built in administrator(this is the first username which is created automatically and yo will be feeding the password at the time of OS installation)
Go to Network connections and in 'IP set page' check the DNS ip as 192.1.1.1
<<I will upload the screen shot>>
Go to "Server Manager"-->Computer Name-->Change-->Domain.
 21 It will be asking for the authentication, then you can use the domain userid and its password which you created just now. (step 17)
 Finally you will get a confirmation

22. Similarly Add Node2 to domain after chaning the name and ip to Node2, and 192.1.1.3
(Follow the same step as 20, in Node2)
23. Steps 23 to 26 are optional, and not mandatory for AlwaysOn. Uusing these steps i have configured one more network, and using which we can copy some data between physical machine and virtual machine. You can't copy any information from physical machine (server) to AD,Node1 and Node2 with out a network
24. Add Internal network to all vm, after stopping them in Hyper-v.
25. Disable all the firewalls, and set ip of physical machine to 192.168.10.20
26. Make shared folders in Node1 and Node2, and copy SQL server setup to
Node1-shared and Node2-Shared
27. Add feature 'Failover Clustering' in both the node.
Server Manager-->Add Feature-->Failover Clustering

You can restart the machine if it asking for that.
Now you can see one more item in the Administrative Tools as 'Failover Cluster Manager'
28. Set domain user as Administrator of Node1
Now we are going to set up Failover Cluster for high availability
29.Enable "AlwaysOn High Availability Group" on both the Nodes and restart SQL Service
Right click on 'SQL server' and select properties, Go to AlwaysOn High Availability Group and enable the checkbox

30. Log in with manupradeep\manu to Node1, Admin tools-->Failover cluster
manager-->create a cluster.


31. I have selected cluser name as cluster_manu, and selected 192.1.1.8 as ip of the
cluser.


32. In SQL server configuration manager, Select 'SQL server
Services'
Start the mssql service if it not
running.
Now we have to go for High Availability Group in SQL.
Double check step 29 by
Right click on 'SQL server' and select properties, Go to AlwaysOn High Availability Group and enable the check-box
33. Log in to Node1, SQL server Management studio
34. Change the log on userid for SQL server service on all the Node to the domain user.
35. Create a userdatabase, DB_MANU and created a table, inserted 10 records
36. Take a full backup of the database.
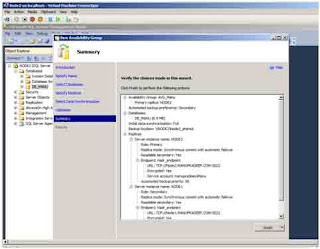
37. SQL server management studio -->Node1--> Alwayson High
Availability-->Create new Availability group.

 I
I have used the name "AVG_manu" as my availability group name.
I
I have used the name "AVG_manu" as my availability group name.

 In the replica tab we have to add both primary and secondary as below.
 check the endpoint tab
 Check the backup preferance option tab
 38. Here we have to add the Listener for Availability group. I have used the name "AVG_Listener" and have used the IP "192.1.1.10".


Oops
I got an issue, the reason I have done this activity earlier and removed the
cluster.

If
you are doing first time you will not get this. If you are getting this, here
is the method to resolve it.
Go to SQL -Configuration
manager -->SQL Service-->properties-->AlwaysOn-->Disable the check
box, and then enable it
After
that use the 'Re-Run' validation button, then I got the screen like this.
39. Restarted the same wizard
So we have done with the setup, once you check the databases in Management Studio you can see the below screen

Here you have to double check the service account of SQL service, and it is better to use the domain user, and the shared location which we mentioned in the Cluster creation should be accessible to this account. If there is any mismatch , the database synchronisation will not work
40. Now we are going to test "Manual failover"
For this i have created a table in primary and inserted few records. Then open the secondary and see the values. As we have selected "Synchronous" both the nodes will get updated.


 If you check the primary and secondary nodes we can understand its roles are changing once we manually fail-over to the other node.
So now we are going to add the .Net framework 3.5
15. Set IP as 192.1.1.2 and computer name as Node1
After that you need to restart the machine
15. Add Feature .Net Framework 3.5 in Node1 virtual machine.
Follow the same step as 11, in Node1 virtual machine
16. Add role DNS Server in Node1
Server Manager --> AddRole-->DSN Server
17. Log-in in AD and create a domain user,
Administrative Tools -->Active directory users and computers -->Users

18.I have created a domain user 'manupradeep\manu' . After creation of this user you need to add this user in Administrator.
For that click 'Administrator' group in the same window, then add the users.
19 You can disable the firewall in all the VM as this is a demonstration. In actual case we have to create rules in Firewall for Inbound and outbound connection.
Now you have to make sure you are able to ping to each machine. If you are not able to ping them, something wrong in the setup and then you will not be able to setup your domain network
20. Now we have to add Node1 virtual machine to domain the created domain. In my case domain is Manupradeep.com
For that connect to Node1, using built in administrator(this is the first username which is created automatically and yo will be feeding the password at the time of OS installation)
Go to Network connections and in 'IP set page' check the DNS ip as 192.1.1.1
<<I will upload the screen shot>>
Go to "Server Manager"-->Computer Name-->Change-->Domain.

21 It will be asking for the authentication, then you can use the domain userid and its password which you created just now. (step 17)


22. Similarly Add Node2 to domain after chaning the name and ip to Node2, and 192.1.1.3
(Follow the same step as 20, in Node2)
23. Steps 23 to 26 are optional, and not mandatory for AlwaysOn. Uusing these steps i have configured one more network, and using which we can copy some data between physical machine and virtual machine. You can't copy any information from physical machine (server) to AD,Node1 and Node2 with out a network
24. Add Internal network to all vm, after stopping them in Hyper-v.
25. Disable all the firewalls, and set ip of physical machine to 192.168.10.20
26. Make shared folders in Node1 and Node2, and copy SQL server setup to Node1-shared and Node2-Shared
27. Add feature 'Failover Clustering' in both the node.
Server Manager-->Add Feature-->Failover Clustering

You can restart the machine if it asking for that.
Now you can see one more item in the Administrative Tools as 'Failover Cluster Manager'
28. Set domain user as Administrator of Node1
Now we are going to set up Failover Cluster for high availability
29.Enable "AlwaysOn High Availability Group" on both the Nodes and restart SQL Service
Right click on 'SQL server' and select properties, Go to AlwaysOn High Availability Group and enable the checkbox

30. Log in with manupradeep\manu to Node1, Admin tools-->Failover cluster manager-->create a cluster.


Start the mssql service if it not running.
Now we have to go for High Availability Group in SQL.
Double check step 29 by Right click on 'SQL server' and select properties, Go to AlwaysOn High Availability Group and enable the check-box
33. Log in to Node1, SQL server Management studio
34. Change the log on userid for SQL server service on all the Node to the domain user.
35. Create a userdatabase, DB_MANU and created a table, inserted 10 records
36. Take a full backup of the database.
37. SQL server management studio -->Node1--> Alwayson High Availability-->Create new Availability group.
 I
I
I have used the name "AVG_manu" as my availability group name.


In the replica tab we have to add both primary and secondary as below.

check the endpoint tab


Oops
I got an issue, the reason I have done this activity earlier and removed the
cluster.

If
you are doing first time you will not get this. If you are getting this, here
is the method to resolve it.
Go to SQL -Configuration
manager -->SQL Service-->properties-->AlwaysOn-->Disable the check
box, and then enable it
After
that use the 'Re-Run' validation button, then I got the screen like this.
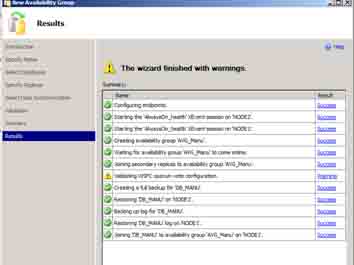
So we have done with the setup, once you check the databases in Management Studio you can see the below screen
40. Now we are going to test "Manual failover"
For this i have created a table in primary and inserted few records. Then open the secondary and see the values. As we have selected "Synchronous" both the nodes will get updated.


